Free sample · first 13 of 130 pages
NISMCAA
Look Listen Play Teacher and Parent Guide
Full lesson notes, instrument guidance and research references

Adult companion to the simpler children’s beginner book.
About this adult companion
A practical course and illustrated instrument guide
National Inter School Music Competition and Academic Award
Prepared for Olushola Adebowale, Founder and President
Purpose
This course teaches students to make music together, compose an original song with a meaningful message, and prepare a confident live performance. It connects NISMCAA’s music competition with its mission of enhancing academic excellence using music as a tool.
Students practice listening, counting, language, cooperation and self reflection through musical activities. The course does not promise improved examination scores or replace subject teaching.
Course delivery
Item | Starting arrangement |
Course length | 12 classes, normally one class per week |
Class duration | 75 minutes, with short practice between classes |
Main pathway | Beginner to intermediate Middle School and High School students |
Adaptations | Elementary School learners, advanced or college learners, and students needing accessibility support |
Final project | An original live group performance of no more than 10 minutes |
Before using this course
Schools should confirm the instructor, age group and teaching arrangements with NISMCAA. Training participation or a completion certificate does not automatically qualify a student or school for the competition, an academic award or a cash prize.
Your colorful practice routine
Follow the colors
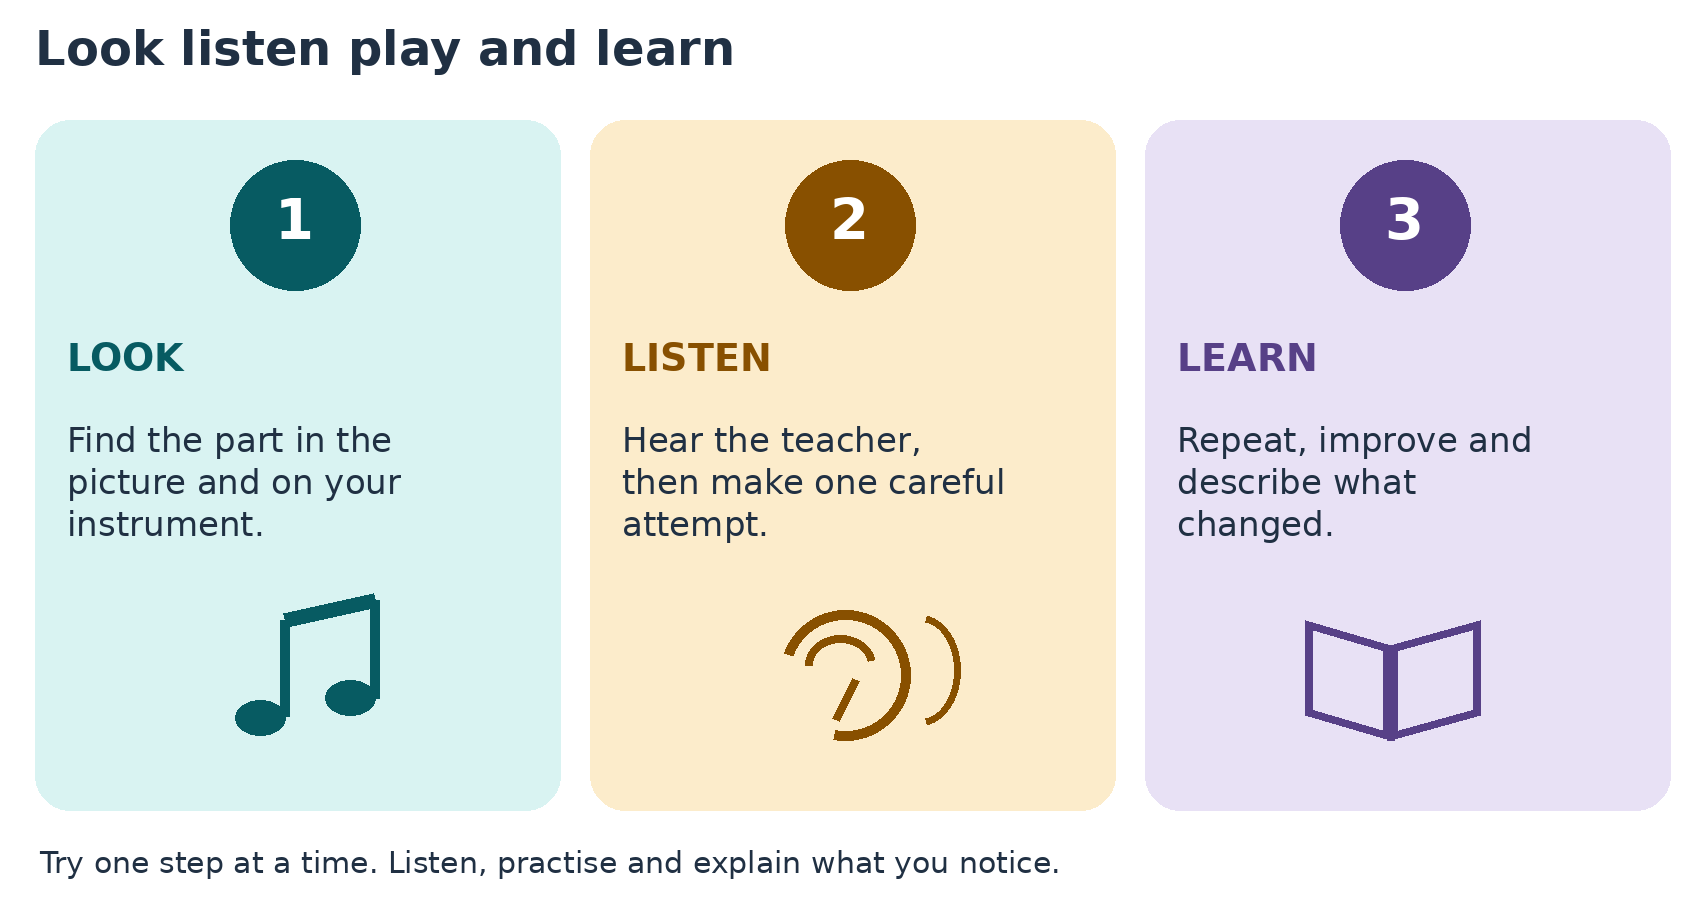
Blue green asks you to look or listen. Gold marks a playing task. Purple marks a classroom connection or reflection. Instrument family headings have their own colors so you can find your chapter. Every color also has words, so you can follow the lesson without depending on color alone.
Keep a small success record
Draw your instrument. Point to one support point and one place where sound begins. After practice, draw or write one thing you can do now and one thing to try next. A teacher checks your playing while you explain your drawing.
Read look and play
This book helps you turn musical ideas into sounds. You will listen, look at the pictures, find the matching parts on your own instrument, and practice a little at a time. A music teacher helps you set up the instrument and checks your first sounds.
How to use an instrument lesson
1. Read the part names. Point to each part on your own instrument before trying to play.
2. Look at the whole-body picture. Find where the instrument rests and how the student supports it.
3. Read where to place each hand. Left and right always mean your own hands, not the left and right of the printed picture.
4. Watch the teacher make a first sound. Try slowly, listen, and change one thing at a time.
5. Play the short exercise. Stop, receive one clear suggestion, and try again. Write or tell what improved.
Small steps make a musician
A steady beat is like the regular steps of someone walking. Rhythm is the pattern you make around those steps. You can walk steadily while saying a sentence with short and long words. In the same way, musicians can keep one shared beat while playing different rhythms.
Learning an instrument is like learning to write neatly. First you find a comfortable way to hold the tool. Then you practice one movement. Speed comes after control. A clear sound at a slow pace is a good beginning.
Choose a starting route
The main reading level is roughly ages 8 to 14. Younger students can work with an adult, point to pictures and echo short sounds. Begin with an instrument that fits your hands and is available at school. Learn one main instrument first while exploring others in listening and demonstration sessions.
This volume introduces 24 common instruments or instrument types. The piano and electronic keyboard share one introductory lesson. Instrument traditions, sizes and models vary; the teacher matches the lesson to your actual instrument.
Find your way through the book
The 12 class course
The first lessons teach listening, beat, notation, melody, singing, musical roles, songwriting, arranging and rehearsal. The final classes help you prepare, review and perform an original group song. Use the existing practice diagrams alongside these lessons.
The instrument library
String instruments: Acoustic guitar, Ukulele, Violin, Cello.
Wind instruments: Recorder, Flute, Clarinet, Alto saxophone.
Brass instruments: Trumpet, Trombone, French horn, Tuba.
Drums and changing drum sounds: Drum kit, Djembe, Conga, Talking drum.
Classroom percussion: Xylophone, Tambourine, Shaker, Triangle.
Instruments with keyboards: Piano and electronic keyboard, Electronic organ, Melodica, Piano accordion.
Close views and first note maps
The flute and saxophone chapters include whole-body, hand and mouth views and first A, B and C fingering maps. These are beginner steps, not a complete fingering chart. The teacher checks the intended register and instrument model before you move to a full scale.
Your voice and microphone
The singing lesson shows phrasing and changes in loudness. The microphone chapter shows the handle grip, aiming, turning with the microphone and moving slightly for a stronger phrase. Practice comfortable singing first, then add amplification.
Your own progress
Use the rehearsal log to record a skill, an attempt and one improvement. A teacher can approve a live demonstration; a video is optional. A drawing can help you remember where a hand goes, but hearing and playing show whether the movement works.
Get ready with your teacher
Ask for help with tuning, straps, stands, reeds, bow tension and instrument assembly. Keep the practice space clear. Use personal mouthpieces or the approved school cleaning routine. Choose a comfortable volume, take short breaks, and stop if playing hurts or makes you light-headed. Adapt the seat, supports, fingering or instrument to your needs.
Teacher assessments and answer keys are provided later in the guide. They are for the instructor; students use the activities and feedback to improve.
Teaching plan and learning outcomes
By the end, students should keep a steady beat, read basic rhythmic values, recognize the treble staff, sing or play a short melody, build an original verse and chorus, rehearse with others and explain how their song addresses its theme.
A normal 75 minute class
Part | Minutes | Activity |
Warm up | 10 | Listening, movement, breathing or a short review |
Teach and demonstrate | 10 | One concept with a worked musical example |
Guided practice | 40 | Individual, paired or ensemble work |
Feedback and reflection | 10 | Specific feedback and one next step |
Knowledge check and task | 5 | Short check and explanation of the practice task |
Equipment and starting assessment
Begin with voices, hand claps, a board and paper. Add school owned or borrowed instruments where available. A keyboard or pitch source is helpful for melody work. Metronomes and recordings may support classroom practice; they must not become prohibited backing tracks, loops or external aids in a qualifying performance.
At the first class, ask students to echo a four beat rhythm, match a comfortable sung note, describe a song’s message and identify any prior instrument experience. Use the results to group learners and choose a suitable starting pace. No entry test or instrument purchase is required for course access.
Accessible learning and supervision
Teaching different learners
For Elementary School learners, divide the class into shorter activities, use pictures and movement, and accept a short song instead of a ten minute project. For advanced learners, add harmony, alternative meters and arrangement analysis. For mixed levels, assign parts according to current skill, then rotate learning opportunities.
Offer seated movement, large print, captions or written instructions, accessible instruments, predictable routines and rest breaks as needed. Agree adaptations with the learner and supervising adult. Assess the musical learning goal rather than physical speed or ability to stand. Course adaptations do not amend official competition rules; agree any event accommodation separately with NISMCAA.
Practical learning routine
Every learner chooses a main pathway such as singing, percussion, keyboard or guitar with the teacher. Each class follows hear or watch, imitate, practice slowly, perform independently and receive feedback. Use 10 to 15 minutes of practice on three days each week, with shorter periods for younger learners. Record the skill, the attempt and the improvement rather than practice time alone.
The instructor demonstrates the actual sound and technique. Written explanations support that demonstration; they cannot replace hearing and playing. For future online delivery, add close up instructor videos and short audio examples before launching independent practical lessons.
Supervision and privacy
Use school approved teaching spaces and communication channels. An approved adult supervises children. Obtain the appropriate school and parent or guardian permissions before recording or sharing student work. Keep learning recordings private by default and collect only information needed for teaching.
Class 1 Music listening and the NISMCAA purpose
Learning outcome Explain beat, melody and musical message; identify one personal learning goal.
Teach
Beat is the regular pulse you can tap. Rhythm is the pattern of sounds and silences around that pulse. Melody is a sequence of pitches. A song can use words and musical choices to communicate a message. Listen to a teacher demonstration and ask what changes when the same line is sung softly, then strongly.
Worked example
Clap four steady beats while saying “We can learn together.” Ask one group to maintain the pulse while another speaks the words naturally. Their word rhythm may differ from the steady beat.
Class activity
In pairs, invent a two line message about school life. Speak it over a steady pulse, then try singing it on two comfortable notes. Give feedback using “I heard…” and “Try…”.
Practice task and evidence
Submit a written or spoken learning goal and a four beat echo demonstration. Younger learners can draw their goal; advanced learners compare the effect of two arrangements.
Knowledge check
What is the difference between beat and rhythm?
Instructor note Begin with the class warm up and review the previous task. Keep practice short and regular. Give each learner a clear next step before moving on.
Class 2 Steady beat rhythm and counting
Learning outcome Maintain a pulse and perform a four beat pattern including silence.
Teach
Tempo is the speed of the pulse. A rest is a counted silence, not a break in counting. In 4/4, count four quarter note beats in each bar. Begin slowly and use claps, taps or accessible movement. Synchronize first; add faster rhythms only when the pulse stays steady.
Worked example
Count “1 2 3 4.” Clap on 1 and 3 while counting every beat. Next use clap, clap, rest, clap. The silent third beat still takes time.
Class activity
One group taps the pulse; another performs the pattern. Swap roles. Ask learners to make two bars with the same four beat length but different clap patterns. Explain how equal bar lengths connect to counting and grouping in mathematics.
Practice task and evidence
Submit or demonstrate two four beat bars and explain where the rests occur. Practice for five minutes on three separate days.
Knowledge check
In 4/4, how many quarter note beats belong in a complete bar?
Instructor note Begin with the class warm up and review the previous task. Keep practice short and regular. Give each learner a clear next step before moving on.
Visual practice for beat and rhythm
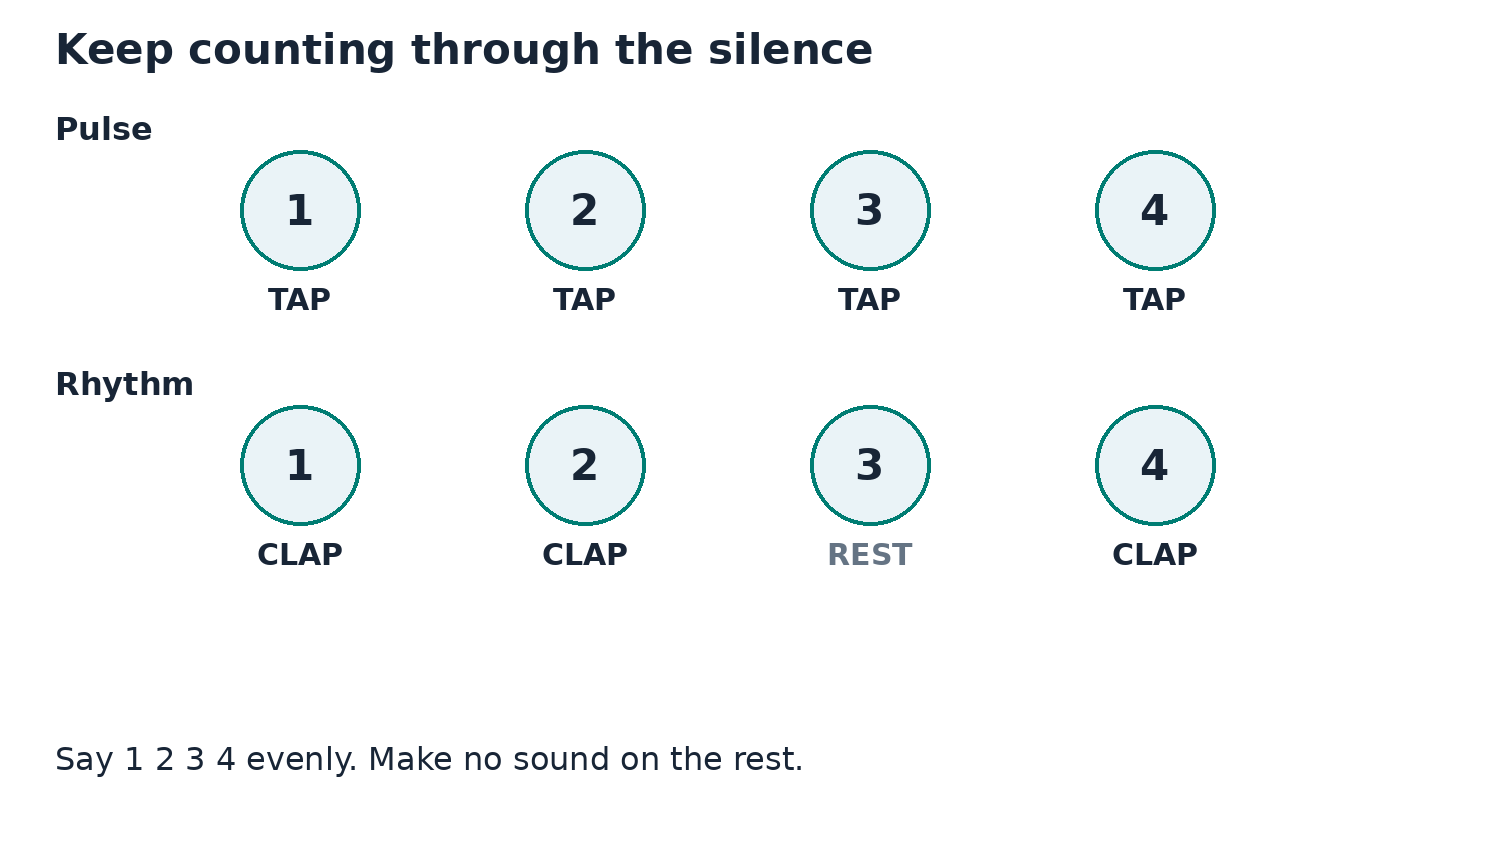
The top row is the steady pulse. The lower row is a four beat rhythm with a silent third beat. Each circle takes the same amount of time.
Try it together
Tap the top row four times. Keep tapping while a partner claps the lower row. Say every count aloud, including count 3. Swap roles and invent another pattern with one rest.
Teacher check
The rest lasts one beat and the next clap arrives on count 4. Use an agreed movement or spoken count where clapping is unsuitable.
Class 3 Note values rests and the musical staff
Learning outcome Combine basic note lengths into a bar and identify the treble staff lines.
Teach
When a quarter note takes one beat, a whole note takes four, a half note takes two and an eighth note takes half. A matching rest lasts the same time as its note value. The staff has five lines and four spaces. Treble clef lines from bottom to top are E G B D F; spaces are F A C E. Duration and pitch are different properties.
Worked example
One half note, one quarter note and two eighth notes fill four beats. Count “1 2, 3, 4 and.” Draw a five line staff and label the bottom line E and the lowest space F.
Class activity
Build four different complete 4/4 bars using written note names or symbols the teacher demonstrates. Then place five named notes on a large staff. Younger learners can use blocks labeled 1, 2 and 4.
Practice task and evidence
Submit four bars whose durations are correct and a labeled treble staff. Advanced learners add dotted notes after mastering the basic values.
Knowledge check
How many eighth notes equal one quarter note?
Instructor note Begin with the class warm up and review the previous task. Keep practice short and regular. Give each learner a clear next step before moving on.
Visual practice for note values and staff
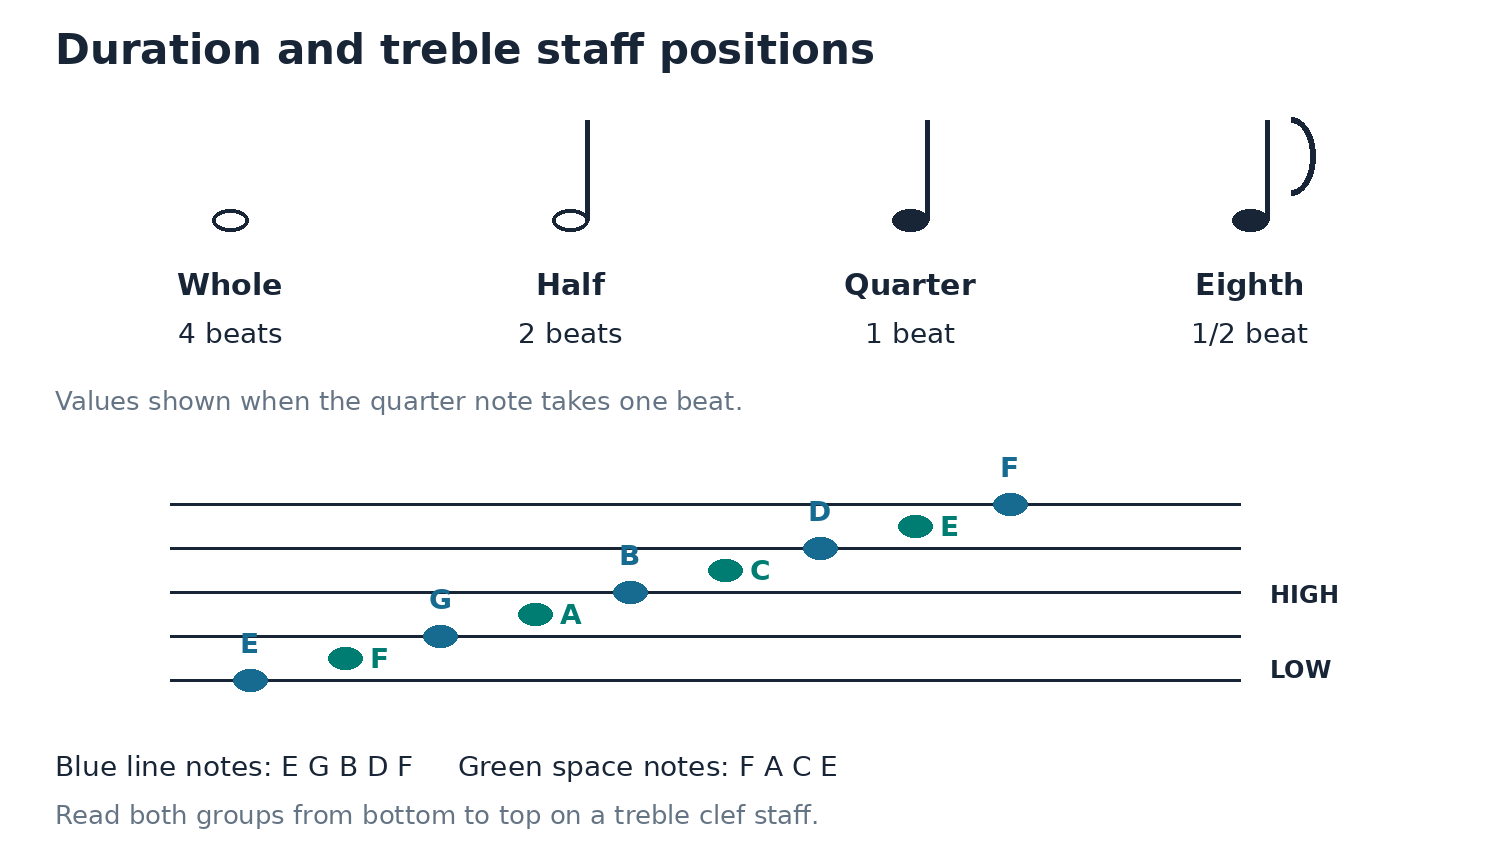
The upper symbols show duration. The lower diagram shows pitch locations on a treble clef staff. Color helps identify the groups; every note is also labeled.
Try it together
Count a whole note for four beats, a half for two, a quarter for one and an eighth for half. Combine one half, one quarter and two eighth notes into four beats. Draw the staff and place E on its bottom line.
Teacher check
Students distinguish duration from pitch and read the lines and spaces from bottom to top. The instructor demonstrates the treble clef and the matching rest symbols separately.
Class 4 Pitch melody and scales
Learning outcome Distinguish higher and lower pitches and perform a short melody.
Teach
Pitch describes how high or low a sound is; loudness describes volume. In C major, the note sequence is C D E F G A B C. The step pattern is whole, whole, half, whole, whole, whole, half. Fixed do solfa names for this C major example are do re mi fa sol la ti do. Keep melodies within a comfortable range.
Worked example
The teacher sings or plays C D E D C slowly. Learners trace the contour with a hand or a drawing before echoing it. Repeat at a suitable pitch for the group; do not require every student to use the same octave.
Class activity
Compose a five note phrase using three scale notes. Sing or play it twice, then change its ending. Discuss which ending sounds settled in the chosen key.
Practice task and evidence
Submit a short melody as a teacher checked recording, live demonstration or annotated note sequence. Younger learners echo three notes; advanced learners explain intervals and create a contrasting phrase.
Knowledge check
Is pitch the same as loudness? Explain briefly.
Instructor note Begin with the class warm up and review the previous task. Keep practice short and regular. Give each learner a clear next step before moving on.
End of your free sample
You have read the free sample of Teacher and Parent Guide (13 of 130 pages).
Buy the complete book as a PDF download for $9.99 (USD). Secure checkout with Stripe; your download opens right after payment and a receipt is emailed to you.