Free sample · first 11 of 104 pages
Look Listen Play
Saxophone for Students
A visual beginner workbook for the alto saxophone
Look • Listen • Breathe • Play
NISMCAA | Book 4
Your saxophone journey
Learn to set up an alto saxophone, find a comfortable position, play first notes and turn them into short melodies. Each lesson pairs a visual guide with a practical task. Progress at your own pace with a saxophone teacher.
All note names are written saxophone pitches. This book starts with B A G and C, then adds lower D E F, the octave lever and a written G major scale.
My name: __________________________________
My school: __________________________________
My teacher: _________________________________
My first goal: _________________________________
How to use your book
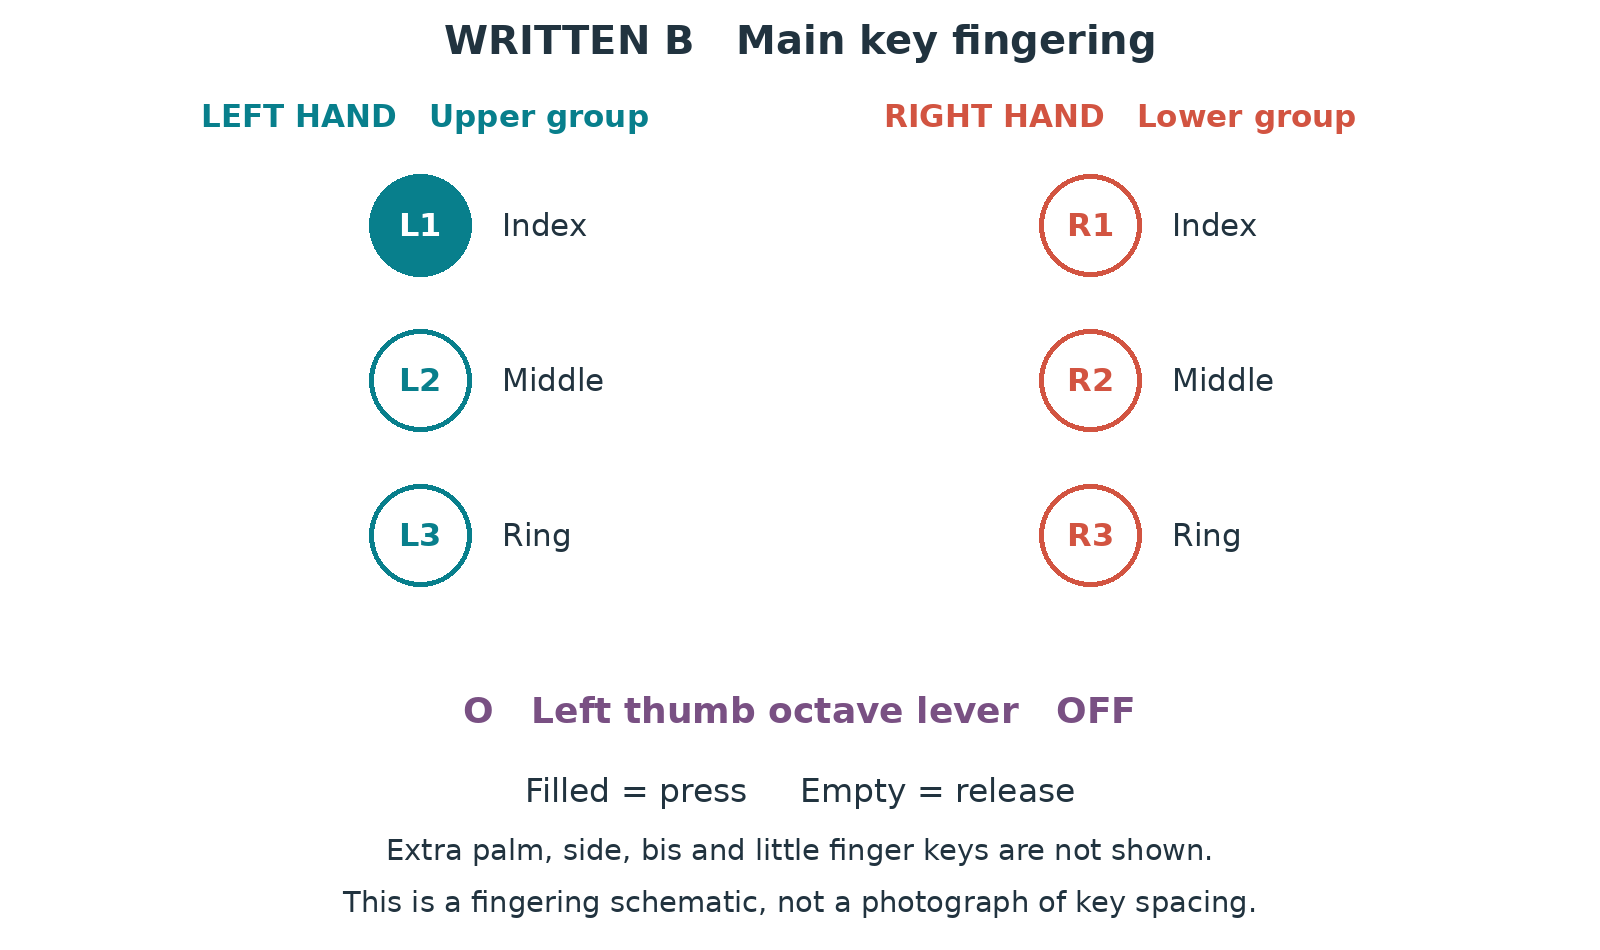
1. LOOK at the picture and locate the same parts with your teacher.
2. SAY the note names and count the rhythm.
3. TRY the steps slowly with comfortable breaths and rests.
4. PRACTICE the next page and show what you learned.
Teacher help matters for mouth shape, reed setup and finger placement. Stop if playing hurts or makes you dizzy. Your teacher can adapt tasks for your needs.
Your lesson route
Each lesson has a teaching page and a practice page. Tick it when you can show its skill.
○ 01 Meet your alto saxophone · 9
○ 02 Prepare a comfortable learning space · 11
○ 03 Meet the mouthpiece and reed · 13
○ 04 Assemble with your teacher · 15
○ 05 Fit your reed carefully · 17
○ 06 Adjust your strap or harness · 19
○ 07 Find your standing position · 21
○ 08 Find your seated position · 23
○ 09 Place your hands on the keys · 25
○ 10 Understand the fingering pictures · 27
○ 11 Let your air flow steadily · 29
○ 12 Shape your mouth around the mouthpiece · 31
○ 13 Make your first B sound · 33
○ 14 Play A with two fingers · 35
○ 15 Play G with three fingers · 37
○ 16 Change smoothly between B A and G · 39
○ 17 Play C with your middle finger · 41
○ 18 Keep a steady four beat pulse · 43
○ 19 Learn short and held notes · 45
○ 20 Leave a musical rest · 47
○ 21 Start notes with a gentle tongue · 49
○ 22 Join notes with a slur · 51
Reference and writing pages begin on page 97.
Your next lessons
Each lesson has a teaching page and a practice page. Tick it when you can show its skill.
○ 23 Read your first notes on the staff · 53
○ 24 Play your first short melody · 55
○ 25 Play F with the right index finger · 57
○ 26 Play E with two right fingers · 59
○ 27 Play lower D with six fingers · 61
○ 28 Build a five note ladder · 63
○ 29 Use the octave lever · 65
○ 30 Understand written and sounding notes · 67
○ 31 Play F sharp · 69
○ 32 Learn a written G major scale · 71
○ 33 Fit two notes into one beat · 73
○ 34 Change volume with control · 75
○ 35 Make a breathing plan · 77
○ 36 Listen for a steadier tone · 79
○ 37 Check common first note problems · 81
○ 38 Practice with one clear goal · 83
○ 39 Create a rhythm answer · 85
○ 40 Write your own short melody · 87
○ 41 Play with another musician · 89
○ 42 Care for your instrument after playing · 91
○ 43 Prepare a school performance · 93
○ 44 Show your progress and choose the next step · 95
Reference and writing pages begin on page 97.
See your playing position
Side view: bring the mouthpiece to your mouth with a secure strap or harness. Keep your head and shoulders comfortable.
Seated view: feet supported and space beside the chair. Ask a teacher to adjust the stand and instrument position.
Find the main key touches
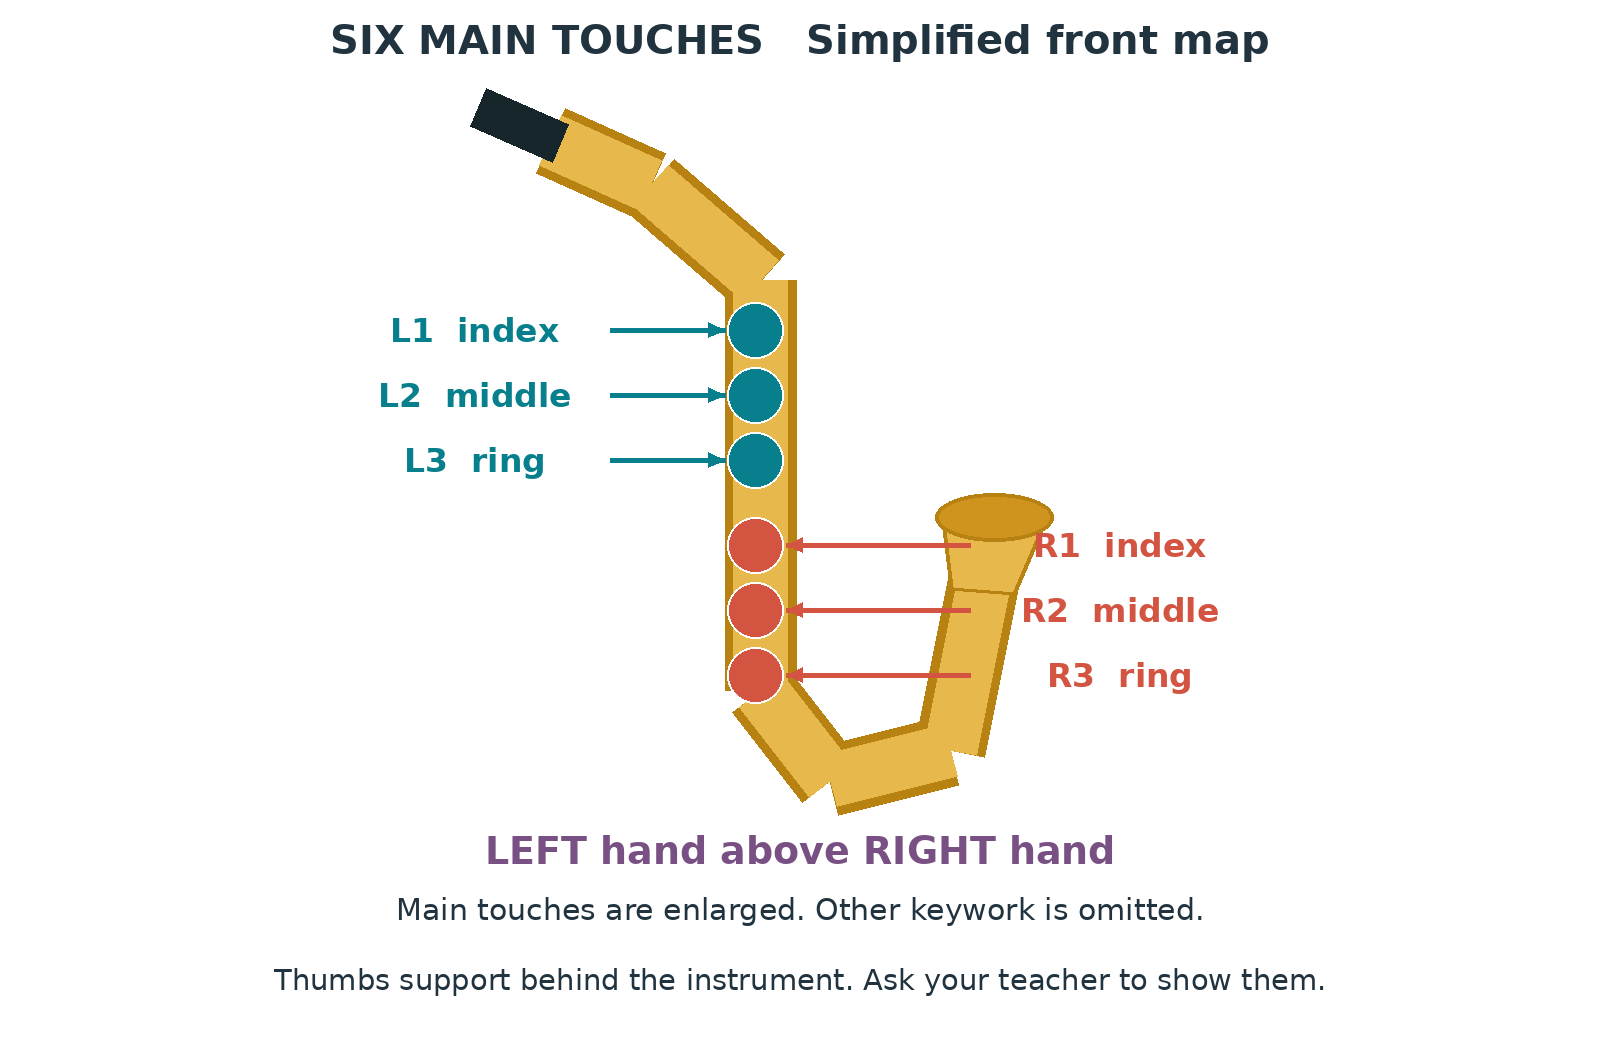
L1 L2 L3 mean left index, middle and ring fingers. R1 R2 R3 mean right index, middle and ring fingers. The left hand goes above the right hand.
The saxophone has extra touches between and beside these groups. Our numbers label only six main touches. Let a teacher identify them on your instrument.
Read a rhythm block
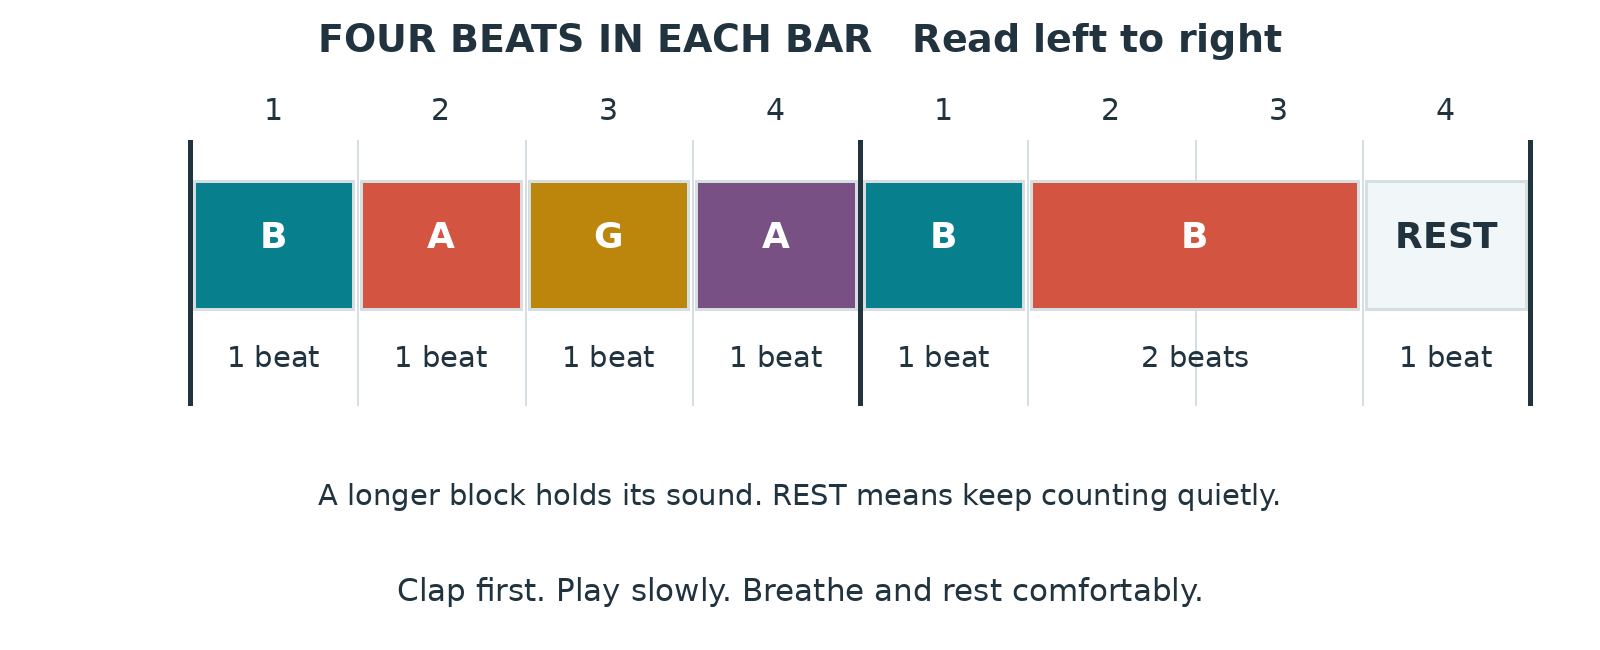
Each bar has four beats. A short colored block means play its written letter for the length underneath it. A wider block lasts longer. REST means count quietly.
This first melody is B A G A | B B for two beats REST. Speak and clap before playing. These learning grids prepare you for reading standard music notation.
LESSON 01 • LOOK AND TRY
Meet your alto saxophone
Discover the instrument you will learn to play.
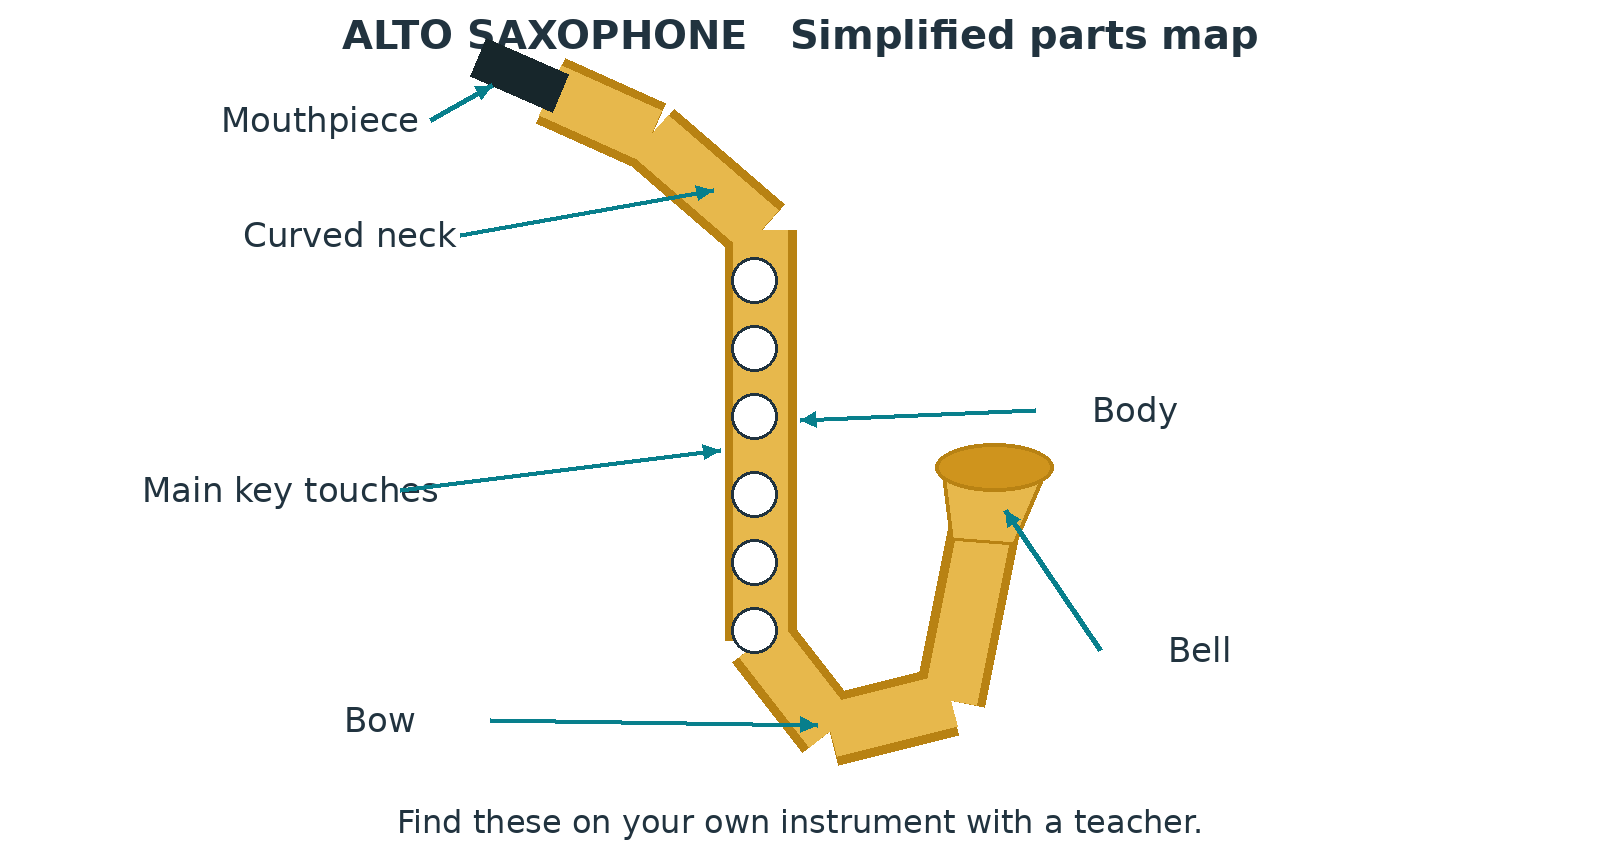
1. Find the mouthpiece, curved neck, body, bow and bell.
2. Listen to your teacher play one gentle phrase.
3. Ask an adult to check that the instrument size and support suit you.
Listen: A saxophone can make a singing sound.
Check: Stay comfortable. Take a normal rest and ask for help when needed.
LESSON 01 • PLAY AND CHECK
Try it yourself
1. Name three parts without looking at the labels.
2. Point to the place where your air enters.
3. Describe one sound you enjoyed.
Ready for more? Draw your saxophone and label its bell.
School connection: Naming the parts practices accurate descriptive language.
○ I tried it ○ I can show it ○ I want help
One thing I noticed: __________________________
My next small step: ___________________________
LESSON 02 • LOOK AND TRY
Prepare a comfortable learning space
Give yourself room to move and listen.
1. Use a stable chair and a music stand at a comfortable height.
2. Keep the case where nobody will trip over it.
3. Use your own reed and mouthpiece, and follow school cleaning rules.
Listen: You should hear the teacher clearly.
Check: Stay comfortable. Take a normal rest and ask for help when needed.
End of your free sample
You have read the free sample of Saxophone for Students (11 of 104 pages).
Buy the complete book as a PDF download for $7.99 (USD). Secure checkout with Stripe; your download opens right after payment and a receipt is emailed to you.