Free sample · first 11 of 104 pages
Recorder for Students
Look Listen Play
A colorful visual workbook for your first soprano recorder lessons

Look • Listen • Breathe • Play
NISMCAA | Book 9
Your recorder journey
Learn to hold a recorder, make gentle first sounds, cover the holes and play short tunes. Every lesson pairs a visual guide with a practical task. Start slowly and learn with a recorder teacher.
Use a soprano recorder in C with Baroque or English fingering. Begin with B A G, then expand toward a C major scale and upper D. These are beginner foundations. Continuing lessons and practice help you become a more confident musician.
My name: __________________________________
My school: __________________________________
My teacher: _________________________________
My recorder model: ___________________________
How to use your book
1. LOOK at the picture and find the same places.
2. SAY the note names and count the rhythm.
3. TRY briefly with your teacher, then rest.
4. PRACTICE the next page and show what you learned.
Use short comfortable attempts with breaks. Stop if playing hurts or makes you dizzy. Ask your teacher to adjust hand reach and lesson pace. Use your own clean recorder and avoid sharing the mouthpiece.
Your lesson route
Each lesson has a teaching page and a practice page. Tick it when you can show its skill.
○ 01 Meet your recorder · 9
○ 02 Choose the matching recorder · 11
○ 03 Prepare a comfortable space · 13
○ 04 Name the parts · 15
○ 05 Assemble gently · 17
○ 06 Read your finger map · 19
○ 07 Give both hands their places · 21
○ 08 Stand comfortably · 23
○ 09 Sit ready to play · 25
○ 10 Cover a hole completely · 27
○ 11 Breathe gently · 29
○ 12 Place the beak at your lips · 31
○ 13 Make your first B · 33
○ 14 Start a sound with your tongue · 35
○ 15 Count a steady pulse · 37
○ 16 Play A · 39
○ 17 Play G · 41
○ 18 Join B A and G · 43
○ 19 Learn note lengths · 45
○ 20 Give rests their time · 47
○ 21 Play your first melody · 49
○ 22 Read the treble staff · 51
Reference and writing pages begin on page 97.
Your next lessons
Each lesson has a teaching page and a practice page. Tick it when you can show its skill.
○ 23 Play upper C · 53
○ 24 Play upper D · 55
○ 25 Use small finger movements · 57
○ 26 Play low E · 59
○ 27 Play low D · 61
○ 28 Play low C · 63
○ 29 Learn Baroque F · 65
○ 30 Build a C major scale · 67
○ 31 Understand written and sounding notes · 69
○ 32 Join notes with a slur · 71
○ 33 Count pairs of eighth notes · 73
○ 34 Plan breathing places · 75
○ 35 Make music expressive · 77
○ 36 Listen and check pitch · 79
○ 37 Solve one sound problem · 81
○ 38 Meet later high notes · 83
○ 39 Play a musical question and answer · 85
○ 40 Write your own short tune · 87
○ 41 Play with your classmates · 89
○ 42 Care for your recorder · 91
○ 43 Prepare a short performance · 93
○ 44 Celebrate progress and choose what follows · 95
Reference and writing pages begin on page 97.
See the playing position
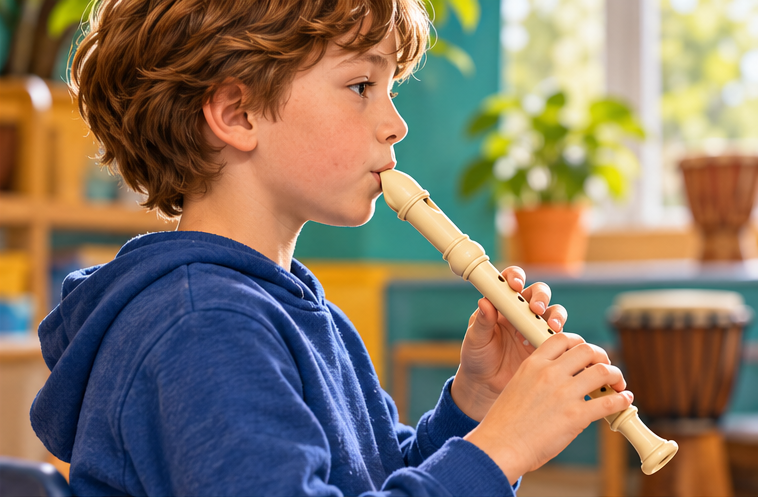
Side view: a gentle lip seal around the beak, head upright and instrument sloping down. Your teacher checks your own comfortable contact and angle.
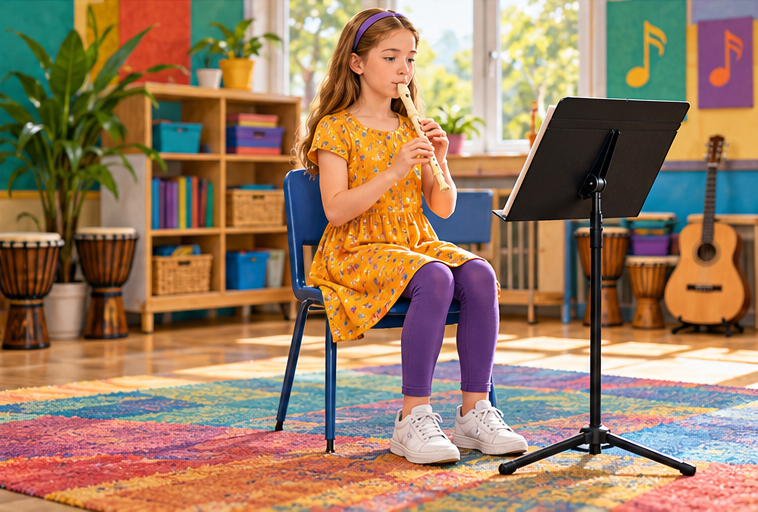
Seated view: stable chair, feet supported and music at a comfortable height. Left hand above right. Right thumb supports behind the recorder.
Read the finger diagrams
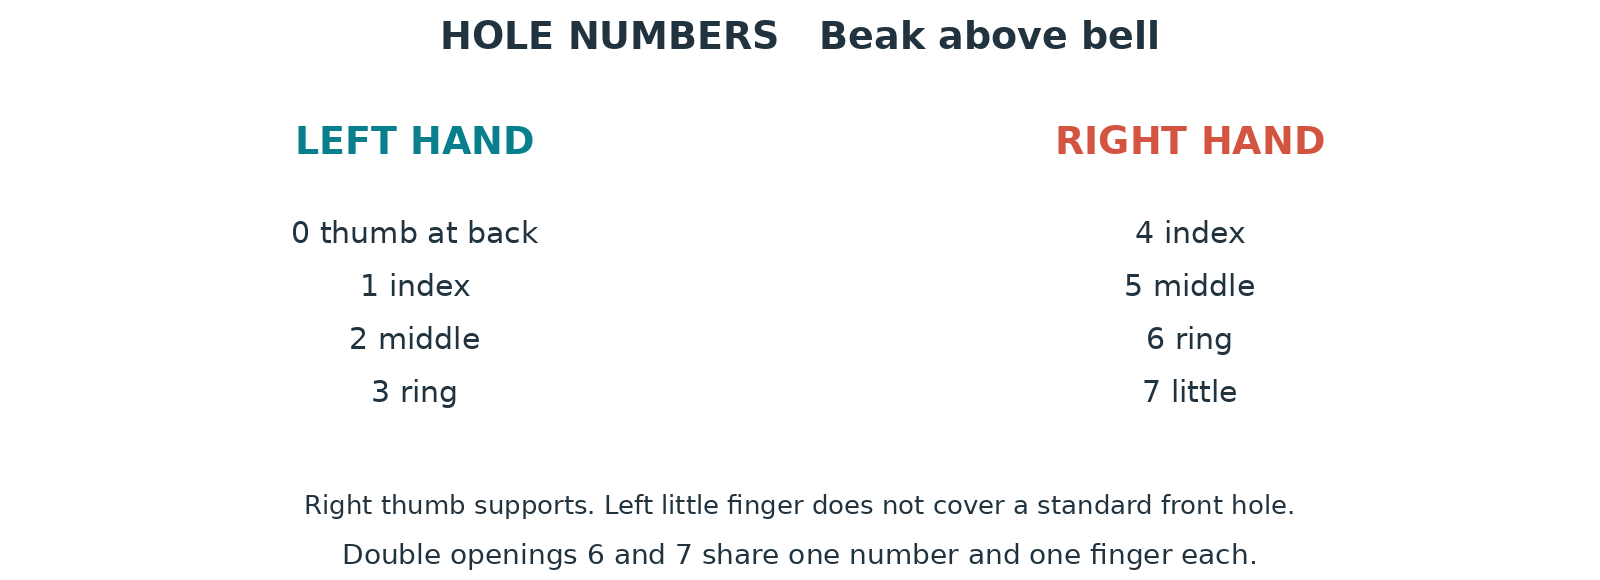
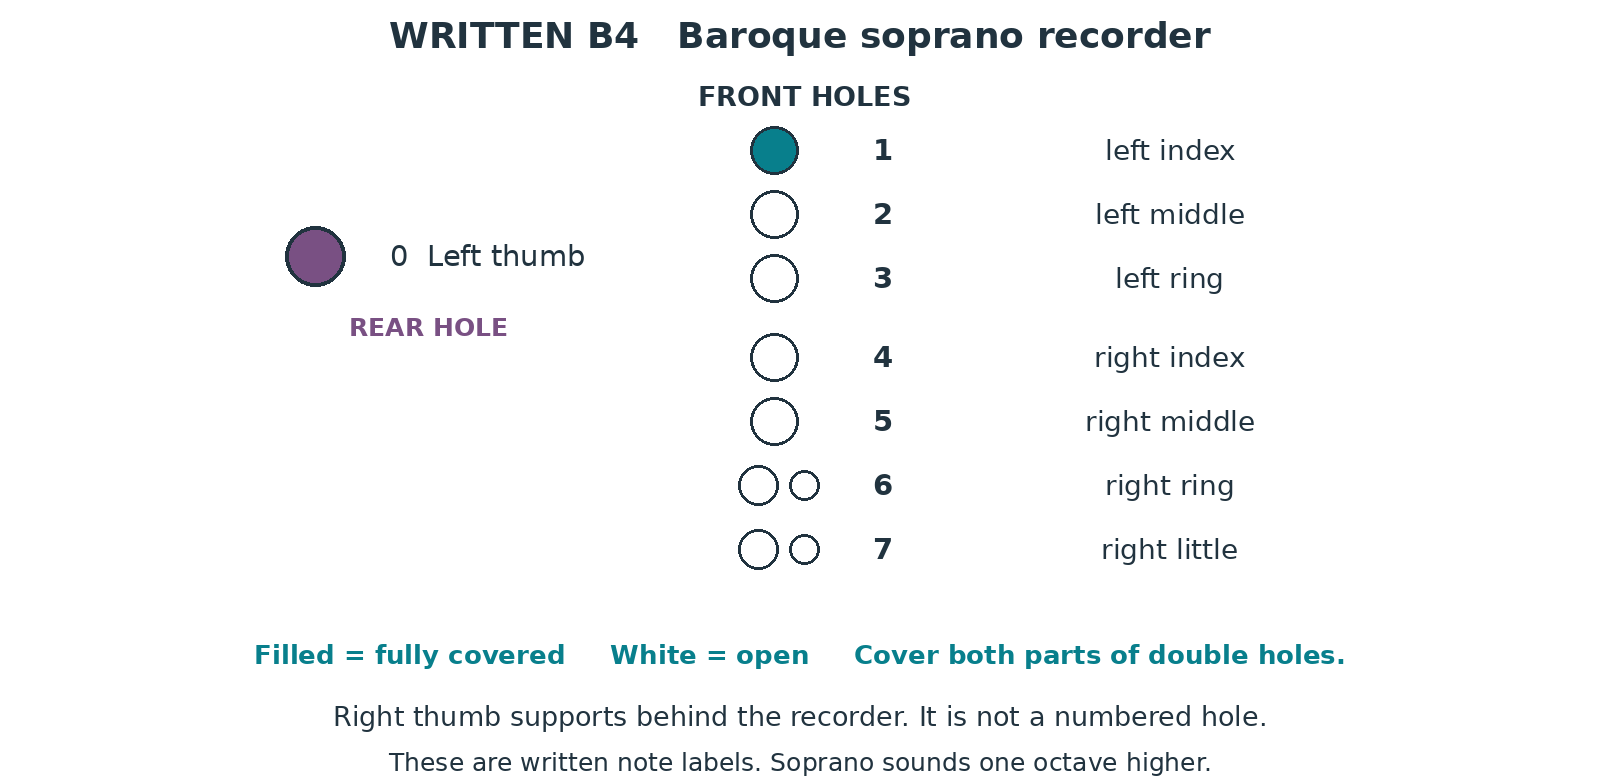
Filled circles mean fully cover the hole. White circles mean leave it open. Rear thumb hole 0 is shown separately from the front holes. This is a reading guide rather than a picture of exact distances.
For double holes 6 and 7, both openings are filled when the whole numbered hole is covered. Ask your teacher to check that your recorder uses Baroque fingering.
Read a rhythm block
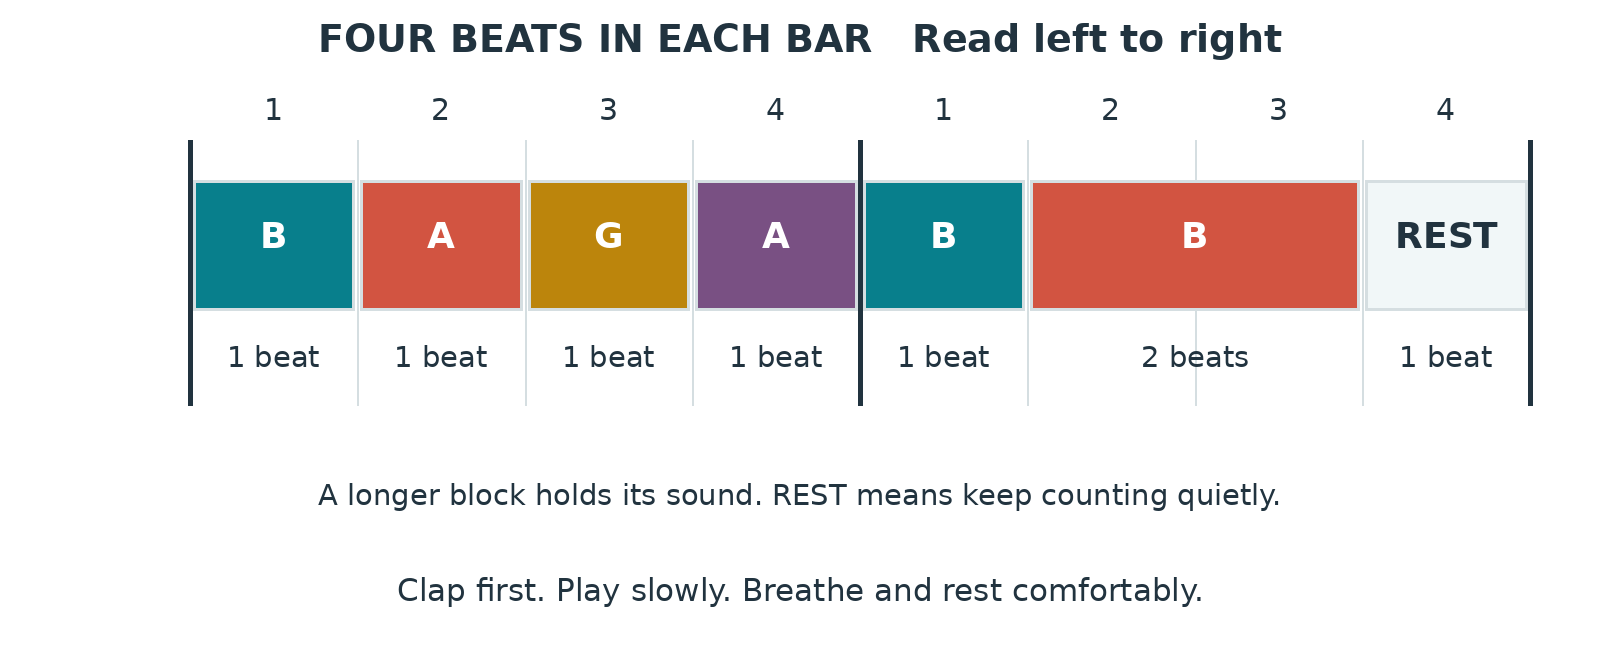
Each bar has four beats. Play the letter for the length underneath its block. A wider block lasts longer. REST means stay silent and keep counting.
Here: B A G A | B then another B for two beats then REST. These mean written B4 A4 G4. Soprano recorder sounds one octave higher. The grids help you learn timing and are not complete musical scores.
LESSON 01 • LOOK AND TRY
Meet your recorder
Discover a small instrument with a singing sound.
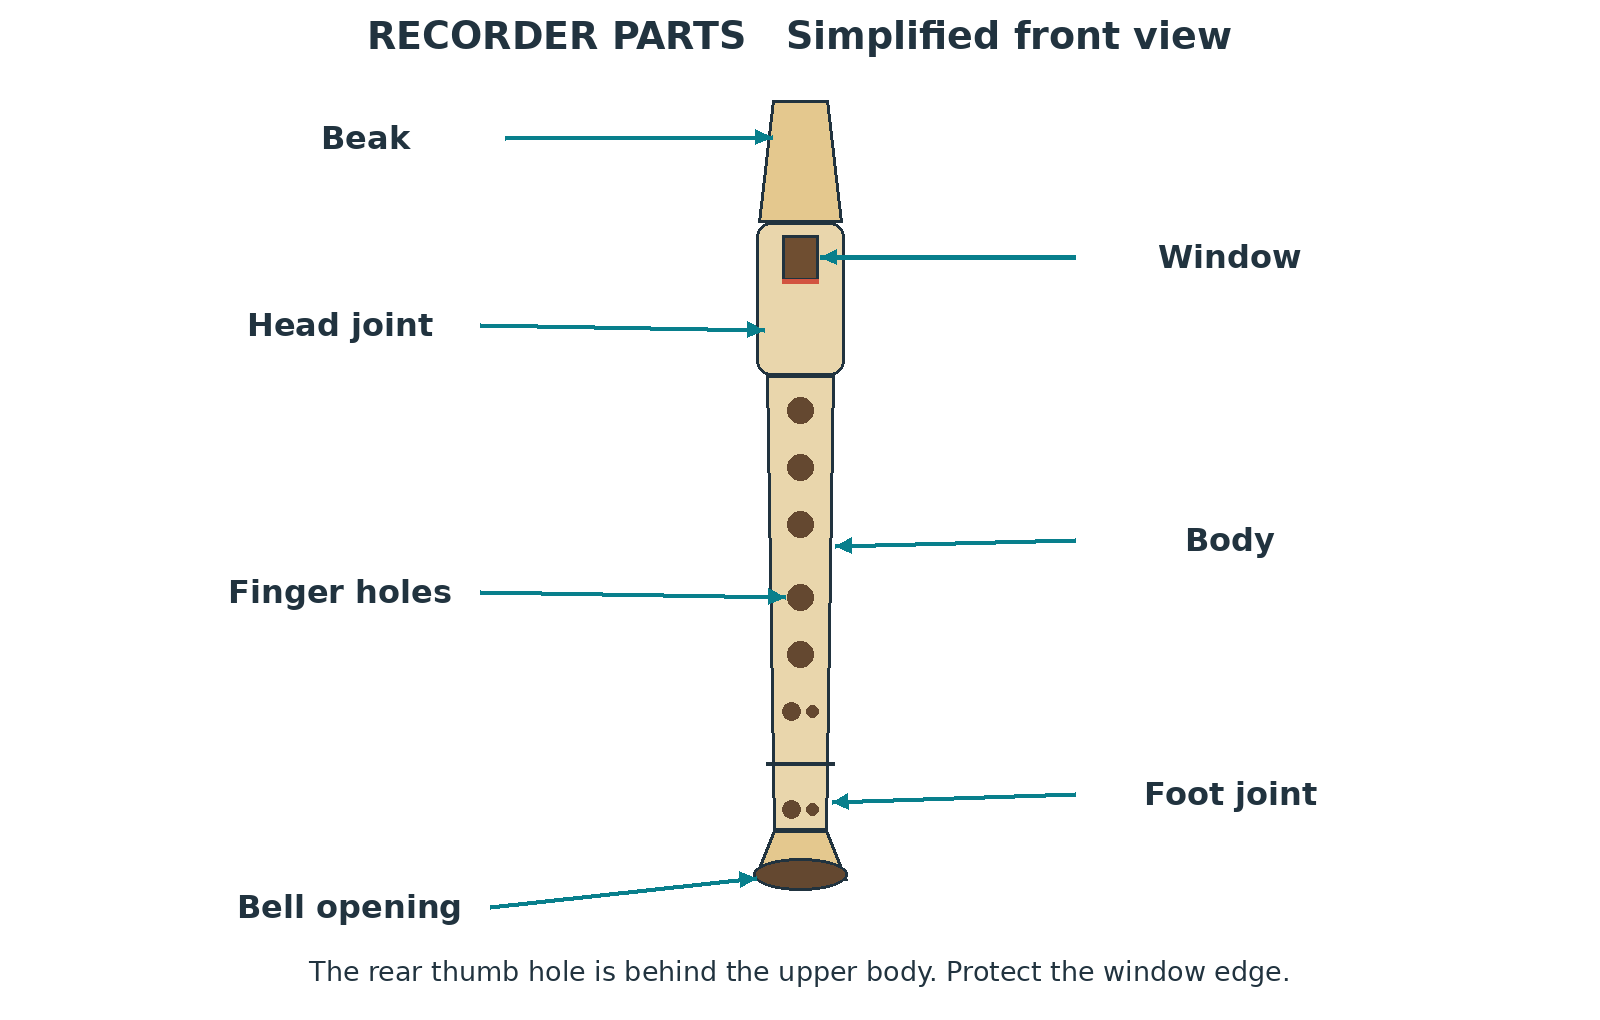
1. Find the beak at the top and the open bell at the bottom.
2. Listen to a short teacher example before trying.
3. Air travels through a narrow windway and across an edge to make sound.
Listen: Notice how a sound begins and ends.
Check: Keep light finger contact and easy shoulders. Take comfortable breaks.
LESSON 01 • PLAY AND CHECK
Try it yourself
1. Point to beak, body and bell.
2. Describe two qualities of the sound.
3. Draw a recorder and name its parts.
Ready for more? Compare a recorder sound with your own singing.
School connection: Describing sounds practices useful vocabulary.
○ I tried it ○ I can show it ○ I want help
One thing I noticed: __________________________
My next small step: ___________________________
LESSON 02 • LOOK AND TRY
Choose the matching recorder
Use a soprano recorder with Baroque fingering.
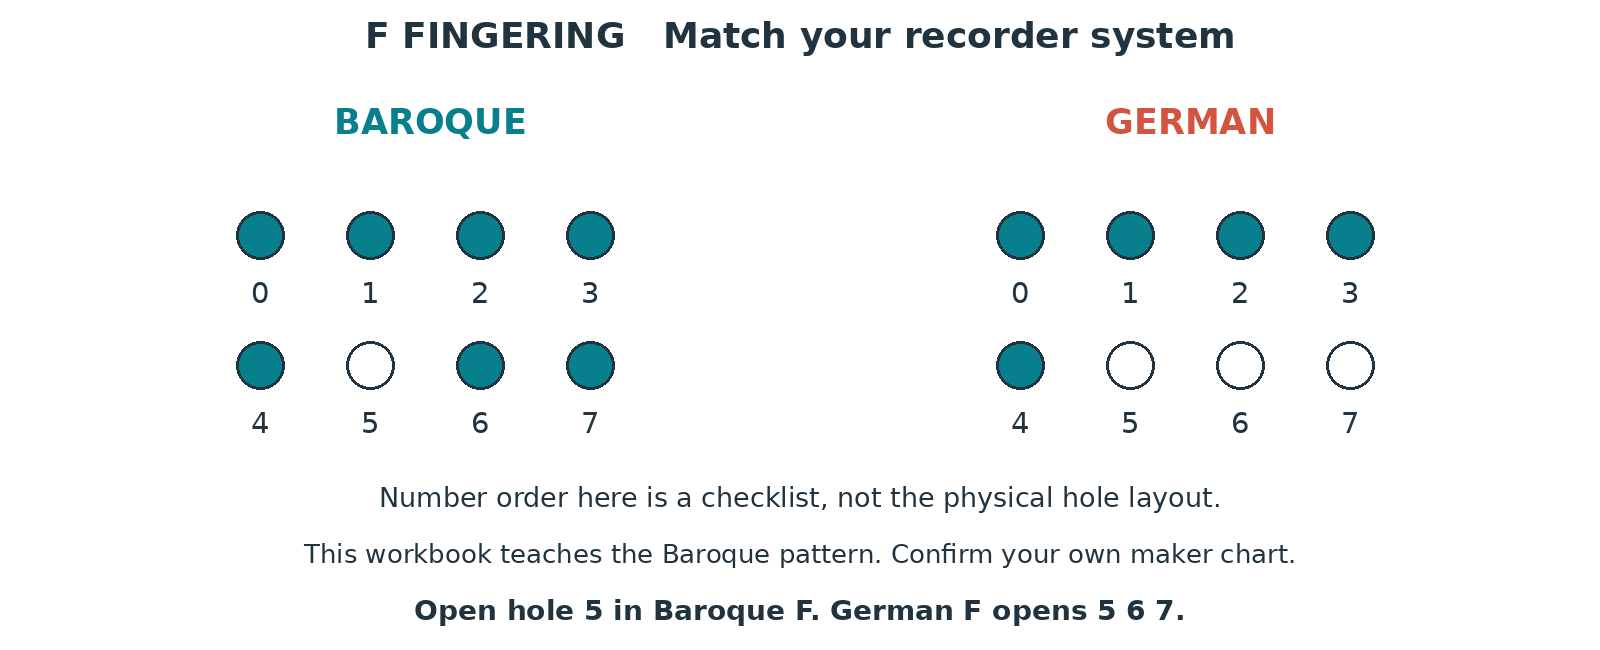
1. Soprano is also called descant and is a recorder in C.
2. This book uses Baroque or English fingering, especially for F.
3. Ask your teacher to identify your model from its markings and own chart.
Listen: A different system needs a different F fingering.
Check: Keep light finger contact and easy shoulders. Take comfortable breaks.
End of your free sample
You have read the free sample of Recorder for Students (11 of 104 pages).
Buy the complete book as a PDF download for $7.99 (USD). Secure checkout with Stripe; your download opens right after payment and a receipt is emailed to you.