Free sample · first 11 of 104 pages
Look Listen Play
Guitar for Students
An illustrated beginner workbook

Hold • Listen • Play • Practice
NISMCAA | Book 1
Your guitar journey
This is your book for learning six-string guitar. Start with a comfortable hold. Learn one sound, then short tunes and chords. Finish by sharing a piece with others.
Use it with a music teacher or a helpful adult. Each lesson has a teaching page and a practice page. You can repeat a lesson as often as you need.
My name: ____________________________________
My school: ___________________________________
My teacher: __________________________________
My first goal: _________________________________
How to use your book
1. LOOK at the picture and find the same parts on your guitar.
2. TRY the numbered steps slowly.
3. LISTEN to one thing you want to improve.
4. PRACTICE the facing page and show your teacher.
Learn one small skill at a time. Keep your shoulders relaxed and take breaks. Stop and tell an adult if playing hurts.
The pictures show right-handed playing in standard tuning. A teacher should adapt the book for a left-handed instrument or another playing position.
Your lesson route
Each lesson has two pages. Tick a lesson after you can show its skill.
○ 01 Meet your guitar · 9
○ 02 Choose a comfortable guitar · 11
○ 03 Sit and support your guitar · 13
○ 04 Know your playing hands · 15
○ 05 Find all six strings · 17
○ 06 Tune with an adult · 19
○ 07 Pluck with your thumb · 21
○ 08 Hold a pick · 23
○ 09 Press behind a fret · 25
○ 10 Keep a steady beat · 27
○ 11 Play and rest · 29
○ 12 Read a tab map · 31
○ 13 Play E F and G · 33
○ 14 Play B C and D · 35
○ 15 Move between two strings · 37
○ 16 Play G A and B · 39
○ 17 Climb a C major scale · 41
○ 18 Play two sounds in a beat · 43
○ 19 Read a simple music staff · 45
○ 20 Play Morning Steps · 47
○ 21 Play Playground Echo · 49
○ 22 Understand a chord diagram · 51
Practice pages follow each teaching page. Reference and writing pages start on page 97.
Your lesson route continued
Each lesson has two pages. Tick a lesson after you can show its skill.
○ 23 Play E minor · 53
○ 24 Play A minor · 55
○ 25 Change E minor to A minor · 57
○ 26 Play C major · 59
○ 27 Play G major · 61
○ 28 Play D major · 63
○ 29 Play A major · 65
○ 30 Strum down on the beat · 67
○ 31 Add gentle up strums · 69
○ 32 Make a rhythm with space · 71
○ 33 Follow a chord song map · 73
○ 34 Play Friendship Walk · 75
○ 35 Play soft and medium sounds · 77
○ 36 Try a simple fingerpicking pattern · 79
○ 37 Make a melody of your own · 81
○ 38 Sing while you strum · 83
○ 39 Play with a partner · 85
○ 40 Use a short practice plan · 87
○ 41 Check a buzz or a silent string · 89
○ 42 Care for your guitar · 91
○ 43 Prepare for a school performance · 93
○ 44 Show what you have learned · 95
Practice pages follow each teaching page. Reference and writing pages start on page 97.
Your hands and your guitar
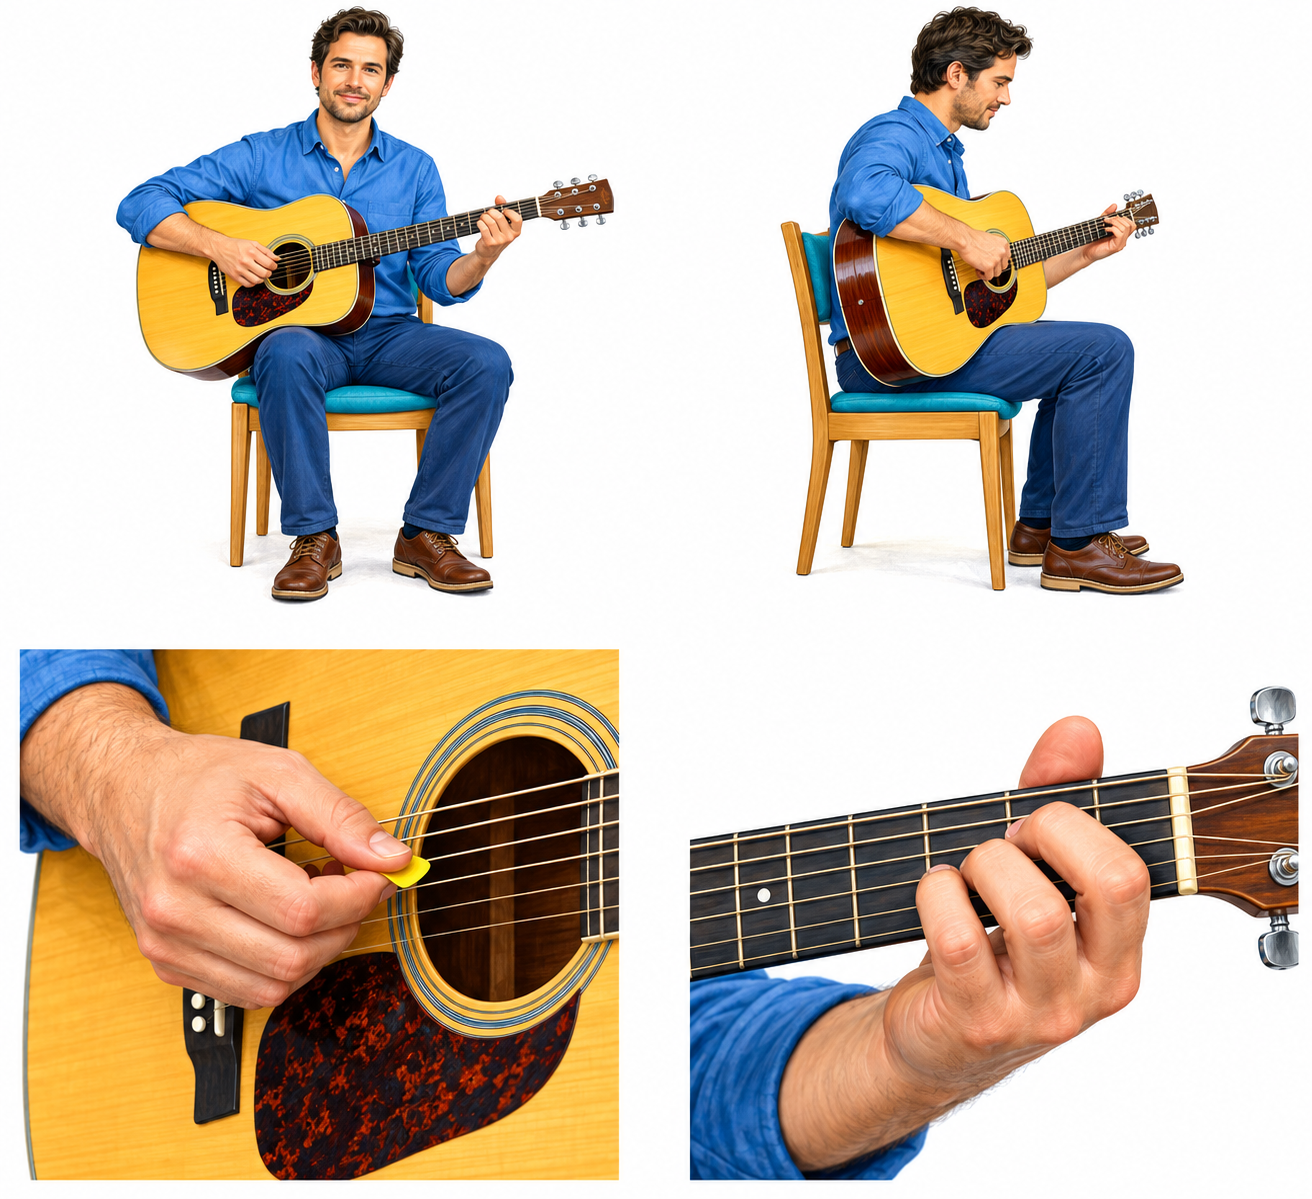
Left fretting fingers: 1 pointer · 2 middle · 3 ring · 4 little.
Right hand: pluck or strum. Left hand: press strings for notes.
Sit or stand with the guitar supported. Your teacher checks the size, strap or seat so your hands can move comfortably.
Six strings to remember
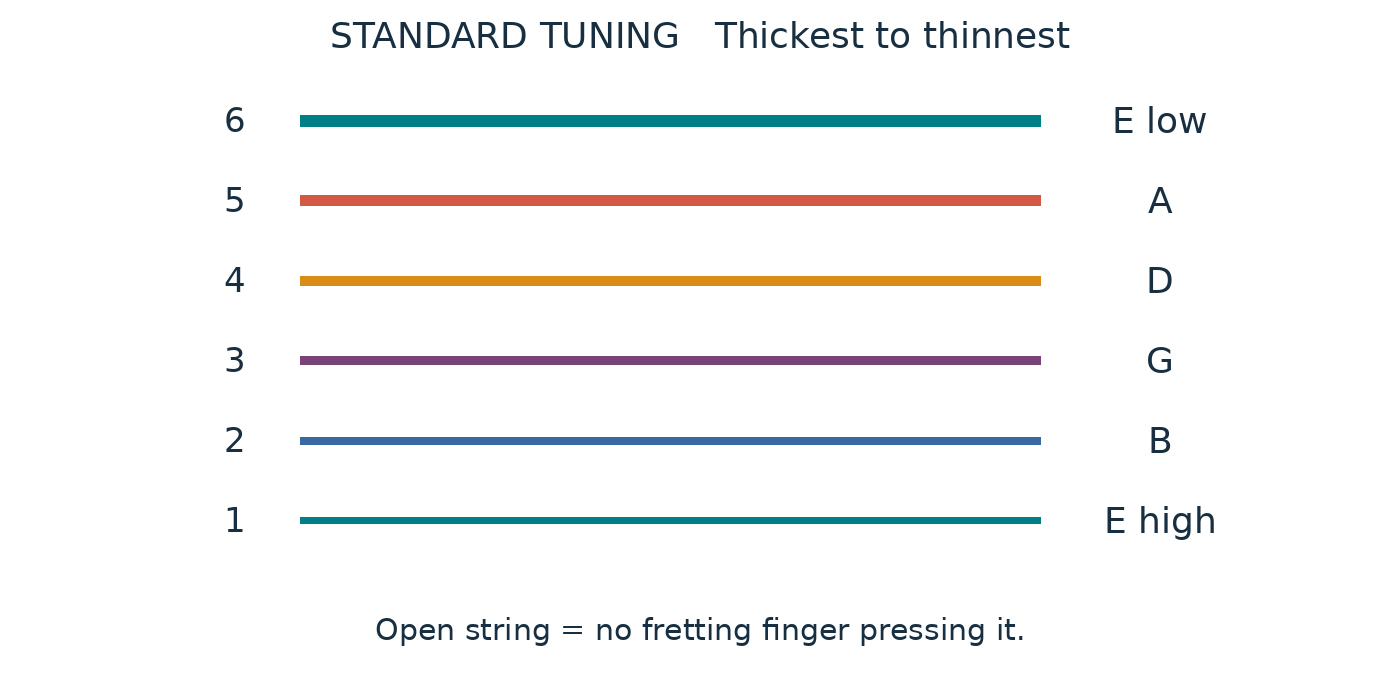
String numbers begin at the thinnest string. When you hold a right-handed guitar, thick string 6 is nearest the ceiling.
Say the names from thick to thin: E A D G B E.
Both end strings are called E. They sound in different octaves, so one is low and the other is high.
Ask an adult to tune your guitar before practice. A badly tuned guitar makes checking your playing harder.
Your picture map key
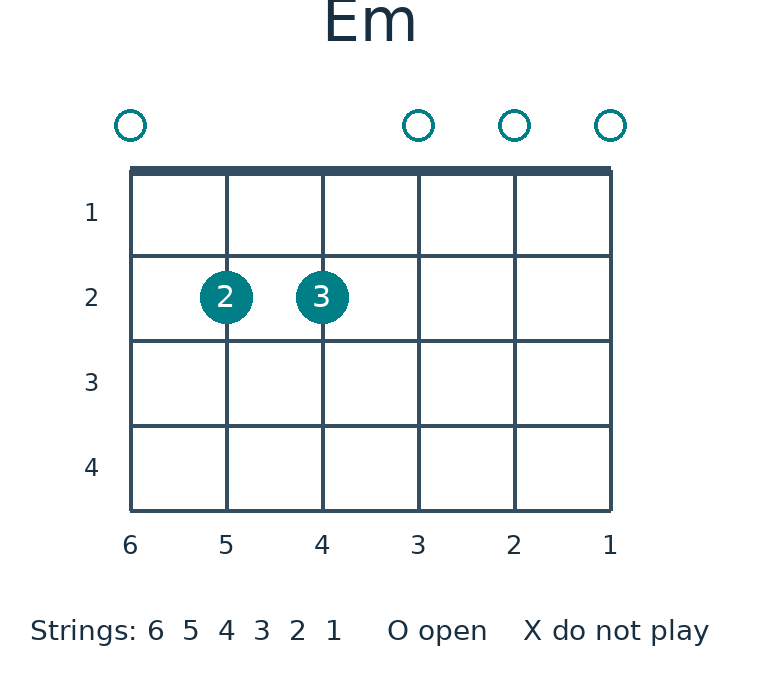
Chord diagram: strings stand upright. Read 6 to 1 from left to right. A dot shows a pressed string. O means open. X means leave it out.
Tab map: six lines lie across the page. Top line is string 1. A number tells you the fret. Zero means open.
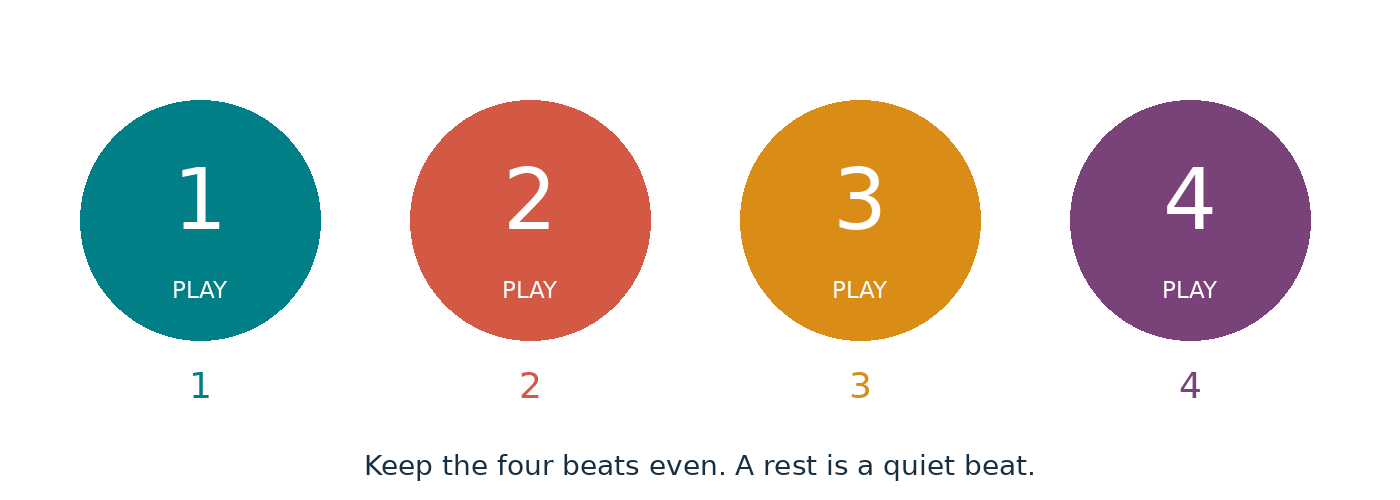
Beat map: four colored beats show when to play, rest or fit two sounds into one beat.
A picture supports your learning. Your teacher checks your real hand position and sound.
LESSON 01 • LOOK AND TRY
Meet your guitar
Name the parts that help you play.
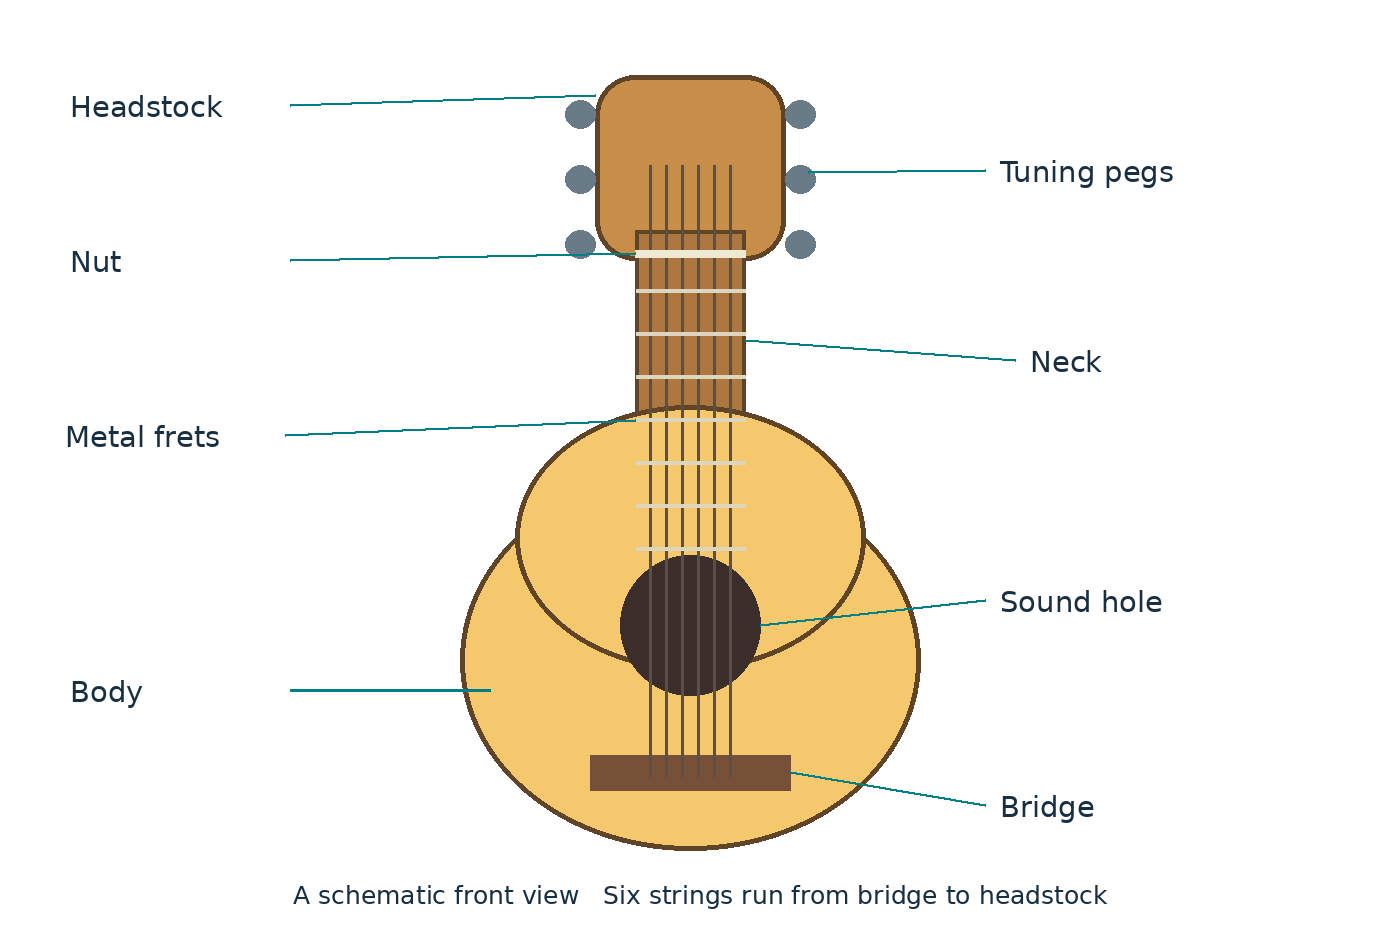
1. Point to the body, neck and headstock.
2. Find the sound hole, bridge and tuning pegs.
3. Find a metal fret. The space before it is where you press a string.
Listen: A plucked string vibrates. The guitar body helps its sound reach you.
Check: Do not put objects inside the sound hole or pull a tuning peg.
LESSON 01 • PLAY AND CHECK
Try it yourself
1. Trace the outline of your guitar in the space below.
2. Add three labels without looking at the teaching page.
3. Point to each real part and say what it does.
Ready for more? Ask a partner to point to a part. You name it.
School connection: Naming and describing parts practices clear language.
○ I tried it ○ I can show it ○ I want help
One thing I noticed: ______________________________
My next small step: _______________________________
________________________________________________________________
________________________________________________________________
LESSON 02 • LOOK AND TRY
Choose a comfortable guitar
Find a guitar you can hold without stretching.
1. Ask an adult or teacher to check the guitar size.
2. Try reaching the first frets with a relaxed shoulder.
3. Ask about nylon strings, steel strings or electric guitar before choosing.
Listen: Nylon and steel strings have different sounds and feel different under your fingers.
Check: A smaller guitar can be the right choice. Reach and comfort matter.
End of your free sample
You have read the free sample of Guitar for Students (11 of 104 pages).
Buy the complete book as a PDF download for $7.99 (USD). Secure checkout with Stripe; your download opens right after payment and a receipt is emailed to you.